Monday, September 30, 2013

Ribbon Reel #63 Shabby Autumn

I hope you had a good weekend.  We sold all the apples yesterday at the Boy Scout carmel apple sale and I made it home in time to do a little yard work.  I rake some leaves, take a break and read for an hour, and then rake some more.  I was amazed at how big a pile I drug out to the curb and then looked up at the trees in the yard and saw not even half of them had dropped yet.   Sounds like there is lots more raking in my future.  I do love this time of year though.  The weather is getting cooler at night so the leaves are starting to change color- it's really spectacular!

We have some gorgeous inspiration from the Ribbon Reel Challenge this time - it's called Shabby Autumn and was chosen by Debbie.  You are instructed to create a project and include flowers. ribbon, and sheet music.  I hope this isn't cheating, but I am a firm believer that colorful leaves are fall flowers!   My sheet music is in the background and on the pretty ribbon wrapping it all together on the front.  I mimic'd the cone in the photo by folding a doily and stuffing it with colorful stamped leaves and a spray of "berry" beads from the wedding shoppe in the  craft store.   I switched up the traditional fall colors in the photo to add a little element of surprise.  I really love seeing something "unexpected"
Special thanks to Cathy Weber for being brave enough to let me use one of her stamp sets for this one.  She paid the ultimate price - the crippling of her beloved matching die set when they decided to shift as they slid thorough my die cut machine.  I think I have too many shims!!  Time to start  thinking about a new cutter!!

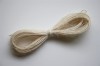
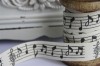
If you need a little more inspiration please visit my Ribbon Reel teamies - they are sure to inspire!
Hugs!


Supplies Used:  Finished Size:  4.5 x 6.25"
Stamps:  Papertrey Ink Leaf Prints, Nuts For You
Dies:  Cheery Lynn French Pastry, Spellbinder Framed Tags 1, Papertrey Ink Leaf Prints
Pattern Paper:  Echo Park Everyday Eclectic Collection "Music Notes"
Card Stock:  SU! Pool Party, White, Vintage Cream
Ink:  Versafine Onyx Black, Memento Sweet Plum, Elderberry, Pear Tart, Cottage Ivy, Tangelo Morocco, Rose Bud, Love Letter, Dandelion

Sunday, September 29, 2013

Poppystamps Petit Four Border Thank You!

Hi Friends! I hope you are having a great day and the sun is shining wherever you are!  Today I'm helping out at the Boy Scouts Carmel Apple Sale.   We are so blessed to have a family of scouters who have relatives who own an orchard.  Every year they donate some hand dipped carmel apples as a fund raiser for the scouts.   I hope they go fast!!!  

Today it's my turn to post on the Poppystamps Blog. The DT always takes turns displaying their creations and you can find daily inspiration there.    I made a fussy looking card that was really simple using just one die - the Petit Four Border - and a colored note card.

I cut the border several times from off white card stock and glued them in rows on the note card. I topped it off with a bow and a button threaded with some twine.
To make the sentiment tag, I used the "Thank You So Much" stamp. Before I inked it up I put a piece of tape over the "so much". Next I dipped it in ink, removed the tape and stamped the "Thank You" sentiment. I trimmed it, used a corner rounder and a hole punch to fashion it it into a tag. This looks so elegant, but was really so easy.

Thanks for stopping by for a peek!  I hope you will visit the Poppystamps blog regularly for die inspiration.  Also on Oct. 5 - World Card Making Day there will be a blog hop with prizes!  Have a beautiful day and enjoy your day!

Supplies Used:  Finished Size: 4.25 x 5.5"
Colored Note Card:  Memory Box
Die:  Petit Four Border Poppystamps
Stamp:  Thank You So Much:  Poppystamps
Ribbon:  5/8" Iridescent ivory Taffeta May Arts, Ivory Button Twine May Arts
Button:  SU!
Ink"  Versafine Onyx Black
1/8" Corner Chomper We R Memory Keepers

Thursday, September 26, 2013

CASE Study #159 - Fall Acorns

Happy Thursday!  To me that means it's time for a new challenge at CASE Study Challenge.   I'm really enjoying our muse of the month - Kathy Racoosin!  She's got a great eye for color and interesting ways to use products.  Check out here design to inspire us this week.  There are lots of neat things here - I loved the rounded corner, the pattern of the embellishment repeated in the background, the die cut banner peeking over the edge of the card.   I think this one is easy to see where the inspiration came from! 


I knew I wanted to make a fall theme card and these little acorns were just the ticket.  I carefully stamped them in a row and kept them straight by drawing pencil lines and using my "ink a ma jig" to line things up perfectly.    I liked the glossy look of Kathy's embellishment so I due cut one of my acorns - inked it in purple of course - and added some "glossy accents" to give that epoxy look. The pennant was cut with a border die.  I kept some of the punch outs in tact and backed it with some matching orangy card stock. 
I hope you find some time to play along this week.  You can find lots of inspiration from the CASE Study design team here.   And our special guest teamie this month is Amber Hight

Chupa - Iwona Palamountain
Amy Wanford
Andrea Ewen
Clare Buswell
Debbie Hughes
Jean Martin
Maureen Plut
Tasnim Ahmed 
Maureen Merritt
Silke Ledlow

Have a great day and I hope I see you at CASE! 


Supplies Used:  Finished Size 4.25 x 5.5"
Stamps:  Papertrey Ink:  Autumn Acorns, Sentiment is from "Nuts For You"
Die:  PTI Autumn Acorns, Spellbinder Tags Trio, Memory Box Piestra Tile
Ink  Memento Tangelo, Morocco, Grape Jelly, Sweet Plum, Elderberry
Ranger Glossy Accents, Button, Button Twine Natural May Arts
Card Stock:  PTI White, Kraft, SU Tangerine Tango

Wednesday, September 25, 2013

SSCB#20 Watercolor

Fall is in the air today - the weather is cool and I'm just loving it!  I've got the air conditioner off, the windows open and cookies in the oven!!  I even took my stinker binker for a walk.  I've graduated from my physical therapy class, now I need to keep strong and work those arms at home.  Who knew that cranking out those dies helps keep your shoulder strong?  I just need to start doing that with my left arm!  That is still a bit awkward but I expect with more practice I'll get the hang of it!  

Today starts a new challenge at  Serendipity Stamps.  Twice a month a challenge is offered up and one random winner walks away with a $20 discount off their next order.  Everyone is a winner though because the sale this week is 40% off your highest priced item (through 10-2- use code "40fromhigh913").  And more good news - there is a new fancy die coming out  SOOOOOON!  You'll be able to get a peek at it on 10-18 when we will be doing a blog hop to celebrate.

Mary the owner of Serendipity Stamps likes to keep us on our toes and expand ourselves creatively.   This time we were to add watercolor to our projects.  I do like to water color - but mostly on vacation when I can't take my die cut machine and all my other favorite things with me.  I usually grab a pad of paper, pencils and a mini watercolor kit.  This was a little harder for me - water coloring a stamped image.  The tricky part was the paper.  I was going for smooth to get a good impression - but the smooth paper seemed thinner and got very wrinkly when I hit it with the water color.   SO I went for the thick textured stuff.  It held up fine with the water, but I was worried about the quality of the impression.  Turns out it worked fine as long as I added a sheet of foam under it while I stamped it.  That allowed for just enough give to get the fine detail of the image.   I also used Versafine Ink that is oil based so it repelled the watercolor. It kept the watercolor "inside the lines" and didn't cover up the detail of the image.

Now it's your turn!  You don't have to watercolor the image like I did - you can water color the background or foreground - or just the parts you want.  Just have fun with it!  Need a little more inspiration?  Check out projects from the rest of the design team.


Thanks for stopping by and have a great day!


Autumn Wreath LgWe Give Thanks
Supplies Used: Finished Size 4.5 x 6.25"
Stamps: Serendipity Stamps Atutumn Wreath
Paper: Watercolor Paper, SU! More Mustard
Ink:  Versafine Vintage Sepia
Watercolor Paint

Sunday, September 22, 2013

Happy Birthday Sharron!

OK Sharron - how did we know it was your birthday?  Well.... a little birdie told me!!!!   Ok it wasn't a little birdie at all - YES!  I will name names!  It was Joyce!!   OK Don't put me on the bad list now!  I know you don't like to have a big fuss for your bithday but I told you friends have to look out for each other!  Right?  You are a big deal to us lady!!

For my other friends - thanks for joining me to celebrate Sharron's birthday!  A few of us are having a little blog hop to celebrate the lady of the day and we hope you will join us!  If you are following along with the blog hop you should have reached me from Darnell!  If you want to start from the beginning - you will start with Joyce!

This one is for my nature loving friend Sharron!  That should tell you everything you need to know about Sharron!  Anyone who loves animals and is a gardener must have a peaceful soul right?  You might know Sharron from her blog - On Papillon Wings (see what did I tell you?) she is the sweetest -and I am so glad I met her!  I hope you will visit her and wish her a happy day.  
The next stop on Sharron's birthday hop is Jill from Greenwood Girl Cards!   Enjoy and thanks for stopping by!


Supplies Used:  Finished Size:  4.5 x 6.25"
Dies:  Memory Box Honeyblossom Sprig, Poppystamps Serene Bird, Spellbinders Tags Trio
Pattern Paper:  Crate Paper Fourteen Collection 6x6" Pad
Card Stock:  PTI Kraft, Vintage Cream
Ink:  SU! Baked Brown Sugar, Memento Angel Pink
Natural Button Twine May Arts
Stamp:  WPlus9 Very Vintage Greetings
Pearl

Friday, September 20, 2013

Awesome News! Splitcoast Stampers!

I just wanted to share with you my new Design Team Assignment that was all hush hush last month.  I am so excited to tell you that I've joined Splitcoaststampers as a member of their Dirty Dozen!  Yes, there are 12 of us, and our term is 6 months - so there are two new DT members every single month!  You wont be able to see any of my projects that I make for Splitcoaststampers on my blog.  The only place you can see them is at Splitcoaststampers of course!  If it's been a while since you've been there or updated your gallery it's time to give it another look.  The web site has new features, and lots of interesting new challenges.  They are a wonderful "go to" for techniques and you'll find galleries for all your favorite products, themes and designers.   The theme this month is "branching out" so you will see all sorts of beautiful fall creations.  Here are links to a few of my projects for this month including a sketch challenge, a photo inspiration challenge, CAS and Fussy versions of the same card, and a spelling fun (the word is L I M B - we had to use ingredients that started with each of these letters).  I hope you will stop by and say hi!

Thursday, September 19, 2013

Waltzingmouse September Release Blog Hop!

If you've been loving the new September Release from Waltzingmouse Stamps I've got some good news for you.  The stamps are in the store and ready to make their way to your house today!  To celebrate the design team is having a blog hop.  In typical Waltzingmouse Fashion  Claire is offering up some blog candy so make sure you leave messages as you go!  One lucky winner is going to receive a treat - a stamp set of your choice!  If you are following along you should have reached me from Chupa's blog.  If you would like to start from the beginning the list is here.
Today I made some tags for you!  I love how something as simple as a tag can really dress up just about anything.  These layered tags with gold foil paper, gold embossing and satin ribbon trim would make any gift so elegant and feminine.

 I made one with a simple tie, and one with a big fat soft satiny bow. 
 And you just have to know I am all about the treats!  I told you this Opera Tags Christmas tag would make for a classic tag for lots of occasions.  Here it is dressed up for Halloween.  I embossed it to make the black extra dark - something about this reminds me of - licorice! 
Ok - now I can send you on your way - but don't forget to leave a comment to be entered to win that free set of stamps!! Your next stop is Jean Martin from Stampin Scraper!  

Have a great day!


Supplies Used: 
Deco Tags
Stamps:  Waltzingmouse:  Putting on the Ritz
Embossing Powder Zing! Gold
Card Stock:  Stampin Up! Pink Pirouette, Gold Graffix
Dies:  Spellbinder Standard Circles, Classic Rectangles, Classic Inverted Scalloped CIrcles, Ribbon Tags Trio 3
Ribbon:   1" Satin Grosgrain Edge PInk May Arts
Gold Cord Martha Stewart
Ink:  Versamark

Halloween Tag
Stamps:  Waltzingmouse All Hallow's Eve, Opera Tags Christmas
Dies:  Waltzingmouse Opera Tags, Spellbinder Ornate Artisan Tags and Accents, Classic Ovals
Embossing Powder: Zing!
Card Stock:  Silver American Crafts, PTI Vintage Cream
Tibbon:  1" Black Satin, Silver Thread, 5/8" Stitch Black White Grosgrain May Arts
Ink:  Versamark

CASE STUDY #158 - Sweet Pea's

Whew!  What a busy week!   I survived senior night and the zig zag folding of 42 home made pinwheels (my poor crampy fingers)!   I got a beautiful daisy corsage (school colors are white and blue) and my photo taken with my favorite high school senior! (yes - my son!!)   We all had a pot luck dinner.  My favorite part of the evening was watching the seniors open gag presents from the rest of the cross country team.  They were supposed to pick out something inexpensive that would help the recipient guess who it was from. There were all sorts of things like silly string, Frisbee, a jar of honey, a dream catcher etc.  I know what???   right?  The silly string was from a boy who is always silly, a jar of honey by one who got stung at a meet (did you think I was going to say he is sweet?), the Frisbee from someone who lost the one that belonged to the team, and the dream catcher from an American Indian.  There was even a bag of sand and a crab apple in there!!!  Apparently someone got sand in their eye, and another one likes to throw crab apples - crazy boys!  What I loved about this was that it showed how well they knew each other and what a close group of young men they are. 

 It's Thursday so there is a new challenge today at CASE Study!  Our muse this month is Kathy Racoonsin from The Daily Marker Blog.  She's got some amazing coloring abilities, and lots of clever ways to use products like die cuts, vellum, and ink.  This lady has been taking me to school all month.  

Check out her design for this week.  Remember focus on the elements of the design that you love and spin it in your own direction.  What had me drooling over this?  First I love a shped card.   I thought it was so smart that she repeated the flower image in the background of her design.  The strip of white embossing added lots of texture and the black highlights in the flower and the trim are so eye catching!  So here's what I came up!  I made a shaped card, stuck with the flower theme and basic layout of the card.  My background is PINK and embossed to pick up on the texture - and you know me - I had to throw in a little gem before I could consider it complete! 
For more inspiration visit the rest of the CASE Study Design team.  I love seeing all the different directions a design can go!
 Chupa - Iwona Palamountain

Amy Wanford
Andrea Ewen
Clare Buswell
Debbie Hughes
Jean Martin
Maureen Plut
Tasnim Ahmed 
Maureen Merritt
Silke Ledlow


 Have a great day and come play with us at CASE Study!


Supplies Used:
Stamps:  Papertrey Ink:  Year of Flowers Sweet Pea
Embossing Folder: Bit of Paislee Cuttlebug
Dies:  Spellbinder Grand Labels 23
Card Stock:  PTI White, W+9 Ballet Slippers
Ink:  Copic Markers, Memento Rich Cocoa, Versafine Onyx Black
Gem:  Jolee's Boutique
Ribbon:  Decorative Trim Hobby Lobby, 7/16" Lace White  

Wednesday, September 18, 2013

Welcome Sonny!!

I have two posts today so if you are looking for the new Waltzingmouse September release please scroll down. Thank you!!! 

This post is an extra special surprise for Jessica!! YAYYY!!   Renee from It's a Patchwork Life -  organized a blog hop to celebrate the arrival of our friend Jessica's new little man!  Actually he's not arrived yet - but any time now!  I understand she even has his name picked out - Sonny!  Big congratulations to you Jessica!  I wish you great joy and happiness - and YES a safe,  quick and easy delivery :) 


You can get a complete list of all the ladies participating and see sneak peeks of their projects at the 12 Kits of Occasions blog.   If you want to wish Jessica well her blog is The Paper Parade!  Give her a hug for me!


Supplies Used:  Finished Size:  4.25 x 5.5"
Stamps:  Waltzingmouse: Nordic Baby
Pattern Paper: October Afternoon Woodland Park, 5 and Dime 8x8" Collections
Card Stock
Ink:  Versafine Majestic Blue
Pin:  Darice
Ribbon:  1" Hanging Cluny Natural Crochet Ribbon Simplicity, 5/8" Sheer Ruffle Edge Navy May Arts
Ivory Button Twine, May Arts
Dies:  Spellbinder Classic Ovals, Classic Scalloped Ovals, Nested Lacey Pennants

Waltzingmouse September Release - Vintage WIitch

Are you getting in the mood yet for a spooookkkky Halloween?  Today the Waltzingmouse Design Team is sharing two more new stamp sets for September.   The stamps are officially released and for sale TOMORROW!    Today we are previewing the new  background  called "Spooky Tree" and a half set called "Vintage Witch".  The new images are classic and very detailed - they remind me of engravings for printing and are really stunning in their detail.  They don't need any coloring at all! 

For this card I used Distress ink and shaded the outside edges.   Next I stamped the branches in Versafine Onyx Black ink to get a clean dark impression.  I even hand rolled that big flower from 1" satin ribbon!!
 I kept this one monochromatic except for a bit of Antique Linen Distress ink on the edges of my "moon" 
 Isn't she just classic?
Want to see more?  Here's a list of the rest of the DT ladies playing along today!


I hope you'll stop back tomorrow for the release day celebration and your chance to win some of these great new stamps!!


Poe Supplies Used:  Finished Size: 4.5 x 6.25"
Stamps:  Waltzingmouse Stamps "Vintage Witch", "Spooky Tree Background"
Card Stock:  PTI Vintage Cream, True Black, Kraft
Ink: Versafine Onyx Black, SU! Smokey Grey, Ranger Distress Spiced Marmalade
Gem:  Jolees Boutique
Dies:  Spellbinder Foliage, Classic Oval, Narrow Beveled Oval (Scrapyland)
1/8" Corner Chomper We R Memory Keepers
Ribbon:  1" Orange Sequin Trim, 1" Black Satin Ribbon, Bead Spray Hobby Lobby

Best Witches Finished Size:  4.5 x 6.25"
Stamps:  Waltzingmouse Stamps "Vintage Witch", "Spooky Tree Background"
Pattern Paper:  Echo Park Chillingsworth Manor 12 x 12"
Card Stock:  PTI Vintage Cream, True Black
Button:  Momenta
Silver Twine
Seam Binding Hug Snug Black, 5/8" Ric Rac Black & Silver Decorative Trim Hobby Lobby
Ink:  Versafine Onyx Black,  Ranger Distress Antique Linen
Dies:  Spellbinder Classic Circles

Tuesday, September 17, 2013

Waltzingmouse September Release - Halloween Fun!

I hope you are enjoying the sneak peeks of the September Waltzingmouse Release.  Today we have lots of Halloween fun for you!  The design team is previewing three more sets - "Splat That" - a mini set with ink spots and claw marks and paint swooshes, "The Count" another mini set featuring the one and only Count Dracula, and a full size Gothic Halloween set called "All Hallows Eve".

My first project features His Excellency the Count with his very own "calling card"  I had to add some bloody red ink splats to make it more terrifying!! Bwahhhh haaahahhaaa!!
 My second project features some pretty scroll work and a poem to keep you safe when the witches appear this Halloween.
I added all sorts of pretty embellishments to my card including a pretty doily, lace, and inked foliage.  To make the lace accent under the flower I threaded button twine through the holes in a 7" length of lace and tied the ends together to form a circle.   The orange beaded spray came from the "wedding" section of the craft store, and  was originally white.  I colored the pearls with Copic markers to add the brilliant color. 
And for those of you who know I am a gardener - here is a photo of a bloom from my very own St. John's Wort in my yard. The flowers are really quite spectacular!   

I know you have lots more you want to see - here's a list of the other DT members who are sharing previews today.

Thanks for stopping by!  I hope you come back tomorrow for more previews of the September Waltzingmouse releases!


Supplies Used:  Finished Size:  4.25x 5.5"
The Count
Stamps:  Waltzingmouse Stamps "Splat That" & "The Count"
Pattern Paper:  October Afternoon "Witch Hazel" Collection 8x8" Pad
Card Stock:  PTI Black, Vintage Cream
Ink:  Versafine Onyx Black, SU! Real Red
Gems
Die:  Memory Box Sideshow Tickets
1/4" Red Satin Ribbon Offray

St. John's Wort  Finished Size 5.75 x 5.75"
Stamps:  Waltzingmouse Stamps "All Hallow's Eve"
Pattern Paper:  Authentique "Thrilling" Collection 12x12"
Card Stock:  PTI Vintage Cream, True Black, Orange Zest
Ink:  Versafine Onyx Black, Ranger Distress Black Soot
Rose:  Wildorchidcrafts.com
Metal Button:  Momenta (Joann)
Dies:  Spellbinder Labels 2, Foliage, Lil Inker Stitched Mats Square, Cheery Lynn Large Sunflower Doily 
Ribbon / Fibers:  1 1/2" Black Grosgrain, 7/8" Ivory Check Black May Arts,  1" Crochet Ivory Lace Natural Wild Orchid Crafts
Pearl Spray: Hobby Lobby