Pages

Wednesday, October 31, 2012

Papers Sweeties Sketch Challenge - November 2012

Hey!  Have  you heard?  There's a new game in town!  The Paper Sweeties is officially launching a monthly sketch challenge!  So it's time to grab you're favorite set and come play!!.   All you need to do is make a creation following the monthly theme and link it on the Paper Sweeties blog to enter.  One winner will receive two Paper Sweetie Stamp sets of their choice.  Here's the sketch for this month from Ms. Shabby Chic herself Debbie Marcinkiewicz - founder of Paper Sweeties!

 Since it is a monthly challenge I thought I would make a Thanksgiving inspired card.   I confess that I am not sure who the paper is by.  It has been in my hoard - I mean stash - for a while now and it always reminds me of Thanksgiving.  It goes back to my pre-blog days when I didn't keep track of brands - just collecting the patterns that I loved.  I  use it sparingly and it's made it through more than a few seasons!   I'm thinking you know what I'm talking about here!    I colored in Jake and Abigail with Copic markers and couldn't resist using the little Tom turkey in the set as my bow topper!  Isn't he the cutest with his little hat, boots, and collar?

Here is the finished card...

Thanks for stopping by for a visit!  I hope you find some time to play and check out the new challenge site at Paper Sweeties!

Hugs!
Jeanne

Supplies Used:
Stamps:  Paper Sweeties PS-A Abigail, PS-J Jake, PS-31 Happy Thanksgiving, PS-30 Gobble Gobble
Patterned Paper:  MY STASH 
Card stock:  Papertrey Ink Kraft, Aqua Mist
Dies:  Cheery Lynn Dutch Tulip Doily
Copic Markers
Versafine Onyx Black, Momento Tuxedo Black
7/8" wired aqua organza, Twinery Caribbean, 1" white lace

Happy Halloween!

 
Just a quick note and card to wish all of you a very happy and safe Halloween!  I know you have doors to answer, or kids to take out haunting!  In my neighborhood weather is hardly ever a factor - adults will be sitting on their porches or close to pit fires in their driveways so the kids don't have to walk so far!  I've even seen parents driving their kids from one door to the next!    The things we do for our kids!  :)  I love seeing the kids in their costumes - especially when the whole family gets into it.  I remember one year my neighbor was Cruella de Ville, and her boys were both dalmations!  I don't have any special tricks planned this year.  Be good and have fun!
Supplies Used:  Finished Size 6" x 6"
Stamps:  Waltzingmouse Cicely at Halloween, Greeting from Gracie at Halloween
Dies:  Spellbinders Petite Ovals, Classic Ovals, Grand Big Scalloped Ovals, Cheery Lynn Francesca Border
Patterned Paper Authentique Glowing Collection 6" x 6" Pad
Card Stock Papertrey Ink Terracotta TIle, White, True Black
Hug Snug Seam Binding Black,
Twinery Mandarin
Buttons
Copic Makers
Momento Tuxedo Black

Tuesday, October 30, 2012

Happy Halloween! .... Almost

It's almost Halloween!  I know the weather is playing all sorts of tricks on us isn't it?  I hope all my friends on the east coast are ok.  It is cold and windy here and I am glad to be warm and cozy inside as I hear the wind whipping around the house!  I even baked some cookies - nothing like baking to warm up the house and make it smell fabulous!
I just wanted to share with you a quick and easy Halloween card I made.  The tree frame die is by Memory box and the witch stamp is by Serendipity.  I made the square flower by folding patterned paper.  You can see the tutorial here.
This little witch is the sweetest!  She's a vision of what to expect to see lots more of tomorrow!  Have a great day!
Jeanne
Supplies Used:  Finished Size 5" x 7"
Stamp:  Serendipity
Dies:  Memory Box Orchard Tree Frame, Debutante frame
Patterened Paper:  Authentique Glowing Collection
Card Stock:  Papertrey Ink True Black
Ink:  Versafine Onyx Black
Marker:  Copic
Brad

Monday, October 29, 2012

Creative Paper Trade - Color My Week #4

Paper Sweeties is joining up with The Creative Paper Trade for their Color My Week #4 - Fall Sweeties Challenge.  They've got some great inspiration pics to inspire you!  You can choose one of  the inspiration photos (color challenge, hearts, circles) or more for your creation submission.  One winner will receive two sets of their choice from Paper Sweeties.  This is a two week challenge so I hope you find some time to play.
I was inspired by the heart photo and made a heart shaped card with a Cheery Lynn die cut adorned with some pretty embellishments.   For the back/inside of the card I folded a sheet of card stock in half and placed the fold just inside the die so that it wouldn't cut all the way through and adhered that to the solid heart die front. 
I used some beaded garland to support my heart shaped card - this is an easy fix to get odd shaped projects to cooperate!  I hope you have a great day - for my friends on the East coast stay safe!  We have high wind alerts for this evening - I plan on staying home and maybe getting a little organized!

Jeanne

Supplies Used:
Stamps:  Paper Sweeties PS-17 Little Wishes, PS-16 So Sweet of You
Dies:  Spellbinder Classic Hearts, Classic Scalloped Hearts, Cheery Lynn Heartland America XL
Flower:  Prima Symphony Blend
Card Stock Stampin Up Pink Pirouette, Pretty in Pink, Papertrey Ink Hibiscus Burst, Vintage Cream
Hug Snug Seam Binding Baby Pink
Ink:  Versafine Onyx Black, Ranger Distress Antique Linen
Pearl Bead Ring Hobby Lobby His & Hers Collection

Friday, October 26, 2012

WMSC #121 - Merci

Hey Guess What?  It's time for the Waltzingmouse Sketch Challenge for this week.  It's become my Saturday morning ritual to check the winners from last week and to see the new sketch inspiration!    I don't know if you ever noticed but the sketches are inspired by Design Team members and sometimes the head mouse herself, Claire Brennon.  Well the next series of sketches for the coming weeks are inspired by the Mischief Makers.  And knock me over with a feather - the first one is inspired by .. YIKES!!!... ME!!    I know... crazy right? 

Well since I was the inspiration for this one I wanted to do something extra special!  I made a French inspired thank you card from me to YOU with lots of embellishments.  I started with some pretty paper from Pink Paislee and the rest fell into place on it's own.   In the center of the bow is a crystal gem from Swarovski Crystal Elements.  I like looking at all the pretty beads and such in the jewelry department of the craft store for pretty metal and glass embellishments.    Even though jewelry isn't my latest obsession some of these beauties find their way into my basket!

I hope you find some time to play this week - you can find loads of inspiration from the Mischief Makers and you might even win a new set of Waltzingmouse Stamps!

Have a great day!
Hugs!
Jeanne


Supplies Used:  Finished Size 5" x 7"
Stamps:  Waltzingmouse Paris Nouveau, Vintage Labels 18, Oval Classic Frames
Dies:  Couture Creations Blossom Yarn, Spellbinders Fanciful Flight, Creative Book Pages Two
Paper:  Pink Paislee London Market Collection "Curiosities", "Royal Charm", "Addington"
Card Stock:  Papertrey Ink Kraft, Vintage cream, Sweet Blush
Border Punch:  EK Success Zig Zag Stitch
Ink:  Versafine Vintage Sepia, Stampin Up! Pretty In Pink
Extras:  Hug Snug Seam Binding Baby Pink, Roses:IamRoses, Button Twine:Waltzingmouse, Pearls, Button, Lace:Simplicity, Swarvoski Crystal Elements

Thursday, October 25, 2012

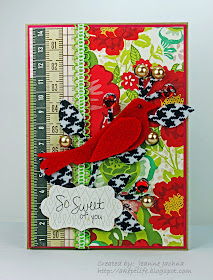
CASE - Red Bird

Well this is my final week as guest designer for CASE Study.  I've really enjoyed the opportunity and I've had so much fun creating with the other ladies there.  I've been playing at CASE Study for quite a while now and I know I've said this once, I've said it a hundred times -CASE always has me trying new things!! I appreciate that they have me reaching outside my comfort zone.  The more I try new things the more I can grow creatively, and the difficult is suddenly so much easier!

The muse this month is Julia Stainton from Belle Papier and here is her design to inspire us this week!    I hope you will play along too for your chance to win and possibly be the next guest design team member - just post your creation with "DT" behind your name when you enter.  So what did I do that was so "new" and awe inspiring this week?? Well I used felt on a card - and get this.... it wasn't a even a flower!!  Fabric is just something I don't normally do - unless of course it is ribbon or that occasional felt flower!  This time I took inspiration from the die cuts in Julia's creation and cut some felt botanicals of my own. 


I cut the branch with some hounds tooth felt I found at Hobby Lobby, and adorned it with gems and pearl berries, and then tucked in a little red felt bird.  The die I used had some little extras on it that I just trimmed off.  The wing I cut freehand to add a little more detail

I really enjoyed being the guest designer this month at CASE.  I can't wait to see who will be the new guest for November!!  I hope you find some time this week to play along and try some new techniques yourself!  Thanks for having a look - have a beautiful day!

Jeanne
 
Supplies Used:  Finished Size:  5" x 7"
Stamp:  Paper Sweeties PS16 So Sweet of You
Paper:  Echo Park This & That Collection "Flower Box", "Yardsticks"
Cardstock:  Stampin Up Rose Red, Papertrey Ink Kraft
Die:  Spellbinders Twisted Metal Tags & Accents, Sizzix Bird with Branch, Branch with Leaves
Pearls Paper Studio, Red Gems Jolee's All That Bling
Felt:  Hobby Lobby
Lace:  Buy the Spool
Ink:  Stampin Up! Basic Black

Wednesday, October 24, 2012

RCC #73 Halloween Spirit

Happy Wednesday!  Wow!  You would not believe the warm weather here in the Midwest - it feels like spring!  So glad I didn't break down and turn the furnace on last week.  Today I was tempted to turn on the air!  Ahhhh... life in the Midwest - you just never know what to expect! 

Today I'm playing along with the Ribbon Carousel Blog Challenge - Halloween Spirit!  Only a few requirements - follow the theme and use ribbon or twine.  And get this... one random winner will receive a ribbon carousel!  How cool is that?  Well you have to play to win so you better get to it!
I decided to make some fun rosettes to decorate with.  I don't use a die - just cut a strip of paper 12" x 2" - run one edge through a border punch and then score every 1/4".  Zig zag fold and assemble by adhering the ends together and hot gluing a punched circle to the center of both sides of your rosette for stability.  The decorating after that is all up to you.  I used wooden kitchen skewers for my "wands".  I wrapped them in satin ribbon, and then ran twine over them.  Its easy to wrap the skewers - just hot glue the end of  the ribbon on the edge of the skewer.  Turn the skewer to wrap it up!  Hot glue the opposite end when you have the entire length of the skewer covered.  Here's some close ups of each. 


These are fun to pop into a vase, a planter, or maybe a cupcake or a big bowl of candy?  YUM!  Have a great day and thanks for stopping by!

Jeanne

Supplies Used:
Stamps:  Cats Life Press
Ink:  Versafine Onyx Black, Ranger Antique Linen
Paper:  My Mind's Eye Lost & Found Two Collection Sunshine Damask "Two of Us", K&Co. Ghostly Greetings Specialty Paper, Glitter Paper DCWV, Grafix Foil Board
Kitchen Skewers
Border Punch Fiskars
Die Cuts:  Spellbinders Inverted scalloped Circles, Classic Circles, Parisian Accents
1.5" Wired Ribbon, 1/4" Satin Ribbon, Twine, Silver Thread
Silver Beads

Monday, October 22, 2012

Happy Birthday Larry!

One of my husband's guy friends had a birthday party this weekend!   His wife thought she would surprise him because gasp!  He is an old guy now!  He just turned 40!!!  He is a new daddy and has been married for only a few years.  He still gets to play cards with the guys though!  His wife played up his love of the game with invitations that featured cards, poker chips and such.  I knew it would be a safe bet to follow suit  (Punny huh?) !!  His cake had edible poker chips and she even baked cookies cut in the shapes of diamonds, hearts, clubs, and spades!   Here's what I came up with for the birthday boy!
I saw this ribbon from Ribbon Trends at Hobby Lobby and some cute matching buttons from Dress it Up to match.  The actual button was of the club (puppy feet, popcorn, clover).  I cut off the back and hot glued it to a bigger red button.
I hope you are off to a great week - this one was lots of fun to make and an easy way to show I appreciate his friendship!

Jeanne

Supplies Used:  Finished Size:  5" x 7"
Stamps:  Waltzingmouse Vintage Labels 5, Back in the Saddle
Pattern Paper:  Crate Paper Emma's Shoppe Collection "Playhouse", Restoration Collection "Lace"
Card stock:  Papertrey Ink  Pure Poppy, True Black, Kraft
Dies:  Spellbinder Fancy Tags 3, Classic Ovals, Labels 5, Cheery Lynn Flower Burst Doily
Las Vegas Puffies KI Memories
Faux Brads
Buttons:   Dress it Up & Papertrey
Ribbon  5/8" Red Twill May Arts, Ribbon Trends Poker Icons Satin
Ink:  Stampin' Up! Real Red, VersaFine Onyx Black

Saturday, October 20, 2012

The Ribbon Reel Challenge #39 Shabby Naturals

Have you checked out the latest inspiration photo from The Ribbon Reel Challenge?  The directions this week are to use the colors from the photo and add burlap/twine/ribbon and MAKE IT SHABBY!!  I loved this photo - looks like it came from the Midwest!  The kind of porch scene that makes you want to sit down and set a spell!  That's Indiana speak for stay a while!  I took inspiration from the lamps in the photo and decided to go with the new Waltzingmouse Bright Season stamps.  I think they are perfect for all year round!  In the summer I have all sorts of lanterns hanging from hooks in my yard from mason jars with tea lights to cast iron with swinging doors!  This is a "thank you" for lighting the way or maybe brightening my day!
I mounted my stamped image on a big square of burlap that I trimmed to size.  I also distressed it with some Antique Linen to give it more of a vintage look.  There's lots of ribbon, twine, burlap and lace options at the Ribbon Reel, it's really impossible to go wrong when selecting some beautiful embellishments for whatever you are working on.  I used some pretty crochet lace and flowers.
I hope you find some time to play.  Challenges last two weeks so you can kick around ideas for a while if you like.  There's also lots of inspiration from their amazing design team to get you started.Have a beautiful day!

Jeanne


Supplies Used:  Finished Size:  5" x 7"
Stamps:  Waltzingmouse Cameo To GO, Bright Season
Pattern Paper:  My Mind's Eye Lost and Found Collection Union Square "Perfect" Damask Print
Card Stock Papertrey Ink:  Vintage Cream, Kraft
Ink:  Momento Dandelion, Cantaloupe, Ranger Distress Antique Linen, Versafine Onyx Black
Dies:  Lifestyle Crafts Nesting Frame Two, Spellbinders Tags Trio
Burlap
Lace Ribbon Reel May Arts Crochet Ivory 1.5"
Roses and Hydrangea The Ribbon Reel
Buttons:  Papertrey Ink
Burlap Cord Natural 1/8" May Arts
Twinery Twine Flax

Friday, October 19, 2012

WMSC120 - Happy Halloween

Are you all set for Halloween?  It's creeping up really quick so I thought I would put Wanda to work one last time before setting her aside for next year!  Halloween is a big affair in my neighborhood.  It doesn't matter if the weather is nice or rainy - adults will be in their driveways next to a fire, and lots of kids will be running in groups from door to door.  Everyone looks out for the kids, and most of us will be outside the house to save them any wait in getting their treats.
This weeks Waltzingmouse Sketch Challenge design is inspired by WM DT member Clare Buswell of Clare's Creations.   This design is a great way to showcase your favourite Waltzingmouse stamp.   Clare's designs are always beautifully dressed, and this design has lots of room for that, from the border through the center, to the little "buttons" for embellishing your design.   Remember they can be what ever you like - the sketch is just a guideline.  I started with my sentiment right in the middle.   I stamped Wanda the witch in shadowy grey over the sentiment and added some fussy cut bats for embellishments.  I used lots of layers - the opera tag stamp/die and a big stamped  doily for lots of drama!

 
I look forward to seeing what you come up with for this design!  See you over at WMSC!! Have a great day!

Jeanne

Supplies Used:  Finished Size:  6" x 6"
Stamps:  Waltzingmouse Hocus Pocus, Large Doily, Halloween Party, Opera Tags
Patterened Paper:  Graphic 45 Communique Collection "Society Page", The Girls Paperie "Toil & Trouble"
Card Stock:  Papertrey Ink True Bladk, Vintage Cream
Ink:  Versafine Onyx Black, Momento Tangelo, Versafine Smokey Grey
Dies Waltzingmouse Opera Tags, Spellbinder Classic Ovals, Big Scalloped Circles, Edgeabilities Classic Petals, Clssic Die Inserts 3
Corner Chomper We R Memory Keepers : Angle
7/8" Double Faced Orange Satin
5/8" Grosgrain Polka dot The Ribbon Reel
Button  Bazzil Bling
Brad Basic Grey

Shabby Tea Room - Rustic Elegance

Happy Friday!  We made it through the week!  It has been cold and rainy here lately!  I am fighting the urge to turn on the furnace because I hate closing up the house.  Spring and Fall are always transition periods in the Midwest between either extremely hot or seriously cold weather.  It is hard to explain if you don't live here, but the every day sort of things change from one time of year to another.  In the summer you don't want to fight the air conditioning so you cook outdoors.  This time of year when things get cold you switch to baking mode.  A baked meal is so comforting, and is so inviting when you get home.  Another big plus is that the heat from the oven also heats the house.  I like to bake because I do all the prep in the morning and then have the rest of the day open.  Easy peasy to put something in the oven and then wait for it to turn hot and bubbly!
Today was one of those days - I have a casserole made - one for my family and one to take over to my mom's.  I had a little time left over to play so I made this card for The Shabby Tea Room Challenge.  I love this wood and flower print paper from Crate paper and finally got to put it to use.  The challenge this week is "Rustic Elegance" and I think this one fits the bill.  Have a look at this beautiful inspiration photo - an elegant feast set out on a wood plank table.  Such contrast.  I tried to capture that here with the wood print paper, crochet lace, pearl center flowers and rough button thread.  I added a beautiful gem encrusted hat pin to mimic the silver candle holders in the photo.

I hope you have a great day - maybe time to create a little something of your own!  I'd love to see what you come up with for this challenge.  You can get all the details here.

Hugs!
Jeanne

Supplies Used:  Finished Size 6" x 6"
Stamp:  Paper Sweeties PS-16 So Sweet of You
Patterned Paper:  Crate Paper Portrait Collection "Bridesmaids", Emma's Shoppe Collection "Playhouse", leaves cut from Echo Park For the Record Collection "Newsprint"
Card stock:  Papertrey Ink:  Vintage Cream
Flowers:  Recollections (Michael's)
Dies:  Spellbinders Foliage, Back to Basics Tags
Ink:  Versafine Vintage Sepia, Ranger Distress Antique Linen
Lace:  Simplicity
Button Thread May Arts Cream
Pin:  David Tutera Collection (Joann Fabrics)
Pearl Ring:  His & Hers (Hobby Lobby)

Thursday, October 18, 2012

CASE STUDY - Halloween Wishes


This is week 3 for me playing Guest Designer for the month of October over at Case Study Blog Challenge. Pinch me I'm still dreaming!  This is one of my favorite places to play and I am so excited to be featured along side some of my favorite designers!  The muse this month is Julia Stainton of Belle Papier!  Check out this design she has to inspire us this week.

I was immediately struck by the stamped background - something I tend to avoid more often than not!  At the risk of droning on again.. this is what I love about CASE.  I'm out of my comfort zone but I'm good with that!  It took me a little more time, but I gotta say.. I am happy with my end result.  My only regret is that I covered up so much of that pretty pattern that it took me so long to stamp!   I liked how Julia took the orange from the umbrella and incorporated it into the stamped background so I threw in a few orange witch silhouettes to match my sentiment tag.

Here's what I learned this week.... heat setting your ink is not for sissies!!  I am always looking for a short cut and didn't understand the importance of using a heat gun until this project.  I wanted to get my ink seriously dark black so I used Versafine ink - I can't tell you how many times I started over because of smeared ink!  I  learned my lesson and I proved my point...next time this WILL BE EASIER!   The little mask is a Spellbinder die from a new release.  Here's the finished card...
Thanks for having a look!   I hope you find some time to play.  You might win a chance to be the next guest designer for CASE Study.  Just link up your creation and put a "GD" behind your name!

Jeanne

Supplies Used:  Finished Size 5" x 7"
Stamps:  Waltzingmouse Hocus Pocus, Cameo Creations, Holiday Labels No. 14
Card Stock:  Papertrey Ink:  True Black, Kraft
Patterned Paper:  Basic Grey Basics Collection  "Jargon/ bas 2600", "Docket / bas 2552"
Dies:  Cheery Lynn French Pastry, Spellbinder Venetian Accents, Labels 14
Ink:  Versa Fine Onyx Black, Stampin Up Tangerine Tango, Ranger Distress Antique Linen
Gems:  Paper Studio

Wednesday, October 17, 2012

Waltzingmouse October Blog Party - Wanda Tag

I have two posts today. If you are looking for my Serendipity blog challenge post please scroll down.  THANK YOU!!
Can you believe it's time to Party already?  Where is the month going?    Halloween will be here before you know it so I am glad for the theme this month... a color challenge to use Purple, Orange and Black.  Doesn't have to be Halloween - whatever you fancy - but me - I love having little things here and there to announce the season! 
I will keep this short to speed up your hopping... so many beautiful things to see .. only so much time to see them all .. and all that!  I made a Halloween tag using a distress ink color blending technique I saw on WM DT member Anya Schrier's blog.  She made a utube video and you can see it here.  I blended three colors of ink for my background, and then stamped the oval frame in Versafine Onyx Black.   I heat set the ink and then masked off the oval.  I stamped Wanda inside the oval with the same ink.  I went over her with a Sharpie to make her even darker and give a washed look.
OK You know me - when I make a tag... I just have to have a few more bitty tags hanging off the side.  This time I used the opera tag stamps - added a gem to one and some bats to the other to keep it SPPPOOOOOOKKKKKYYYYY!
Click here to see all the projects that are linked up!!  Thanks for the "look see"!!  Happy Hopping!
Jeanne
Supplies Used:
Stamps:  Waltzingmouse:  Halloween Party, Vintage Labels 10, Opera Tags 
Dies:  Spellbinders Floral Ovals, Petite Ovals, Labels 10, Waltzingmouse Opera Tags
Ranger Distress Ink:  Seedless Preserves, Mustard Seed, Spiced Marmalade, Antique Linen, Versafine Onyx Black, Stampin Up Tangerine Tango
Card Stock: Stampin Up Rich Razzleberry, Papertrey Ink: True Black, Stampers Select White
Extras:  Buttons, Gems
Twinery:  Twine Charcoal
1.5" Wire Edged Ribbon (Kirkland COSTCO 50 Yards)